How to Set Color Profile in Windows 10
A monitor with accurate color representation is always important (especially for anyone who works in photography, edit videos professionally, or play games), and because no every display is built the same, it's crucial to use the right color profile to ensure colors look as natural as possible.
A color profile is a set of information that instructs the system how colors should appear on the screen. Only when using the appropriate profile for a device (for example, monitor, camera, printer, and scanner), you'll be able to see colors as intended by the manufacturer.
Although Windows 10 does a great job displaying colors on the screen, if your computer isn't configured with the correct profile, you may notice color accuracy problems, including colors that look washed out or otherwise off on your screen.
If you're seeing colors not rendering correctly, there's a good chance that it's not an issue with the monitor. Instead, it could be a color profile problem, which you can quickly resolve using the Color Management tool.
In this Windows 10 guide, we'll walk you through the steps to find and set the correct color profile to achieve the best color representation possible on your monitor.
- How to find color profile for your monitor
- How to install color profile for your monitor
- How to reset color profile settings on Windows 10
How to find color profile for your monitor
Typically, manufacturers include the appropriate color profiles (described as ICM or ICC files) within the driver, or on the disk that comes with the monitor.
If you have the disk and a disk drive, you can extract the color profile that way. However, if you don't have the disk, it's recommended to download the file from your manufacturer's support website.
To find and download the correct color profile for your display, use these general steps:
-
Open the manufacturer's support website for your monitor. Here's a list with some of the popular monitor manufacturer's support websites:
- Dell.
- HP.
- Samsung.
- LG.
- ASUS.
- Acer.
- BenQ.
- Navigate to the downloads section.
- Using your monitor's model number, search for the latest monitor driver (not graphics driver).
-
Download the package, which may be available as a .exe or .zip file format.

- Double-click the downloaded file.
- Continue with the on-screen directions to extract its content.
- Open the folder with the extracted files.
-
Locate the .icm file, which is the color profile for your monitor.
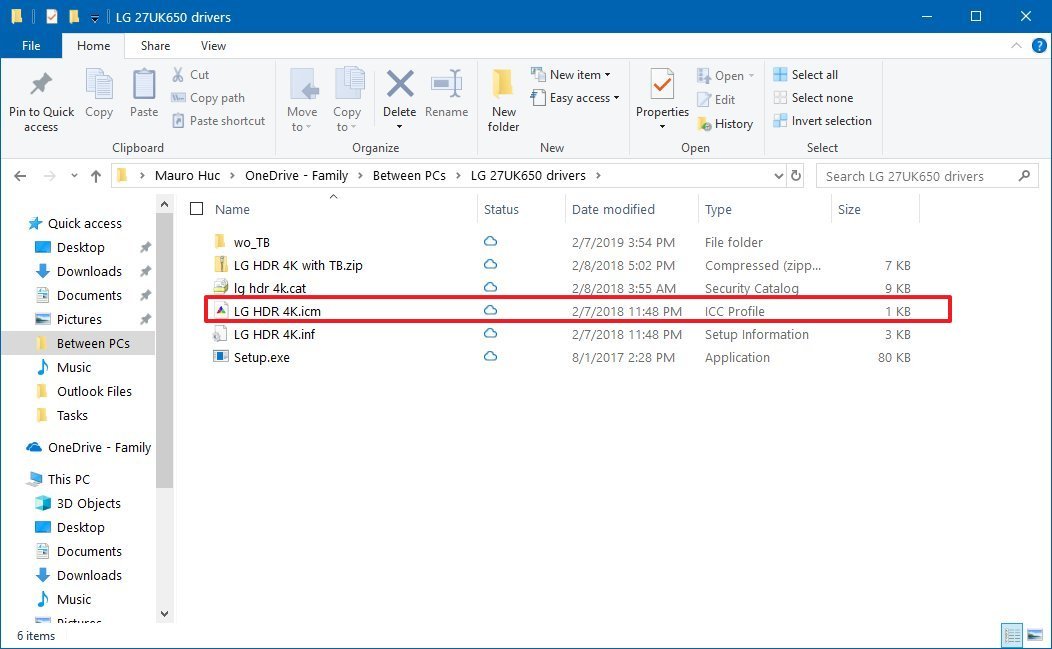


Once you complete the steps, you can proceed to install the correct color profile for the monitor.
How to install color profile for your monitor
After acquiring the profile, the next step is to install it on your device, which you can do using the Color Management tool.
To install a color profile on Windows 10, use these steps:
- Open Start.
- Search for Color Management and click the top result to open the experience.
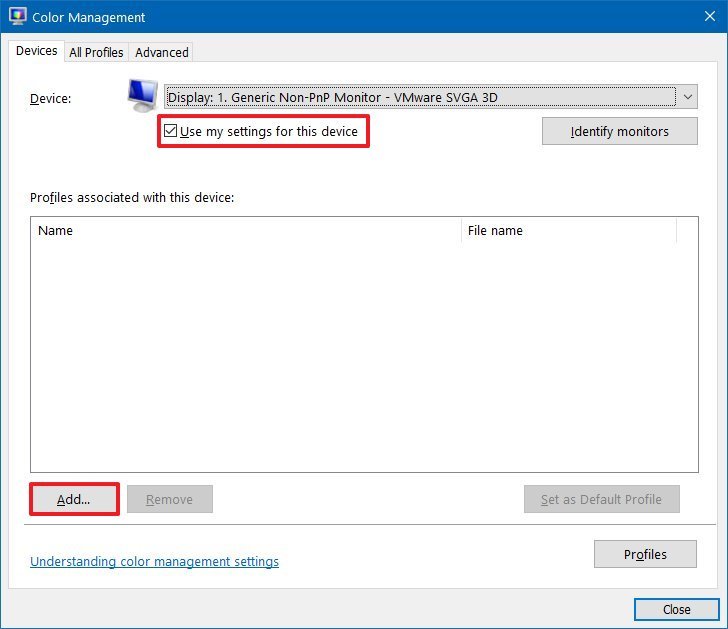
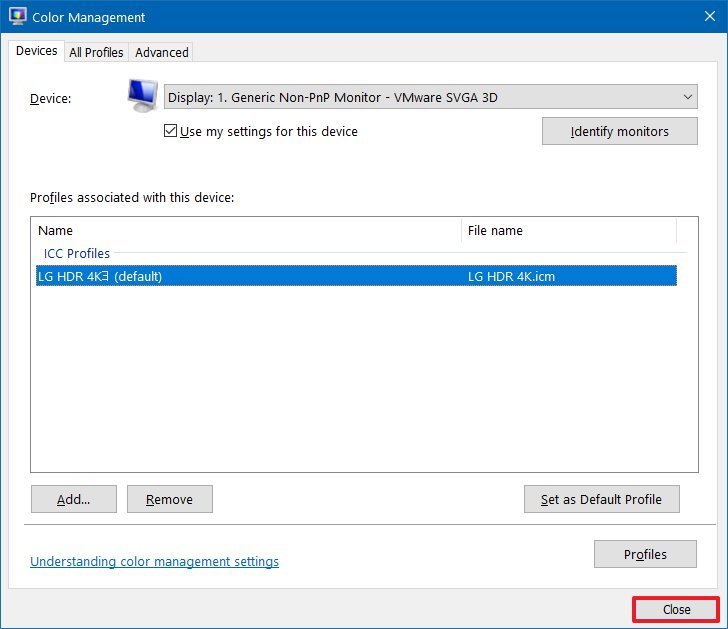
- Click the Devices tab.
-
Use the "Device" drop-down menu and select the monitor that you want to set a new color profile.
Quick tip: If you have a multi-monitor setup, and you're not sure which monitor you're about to update, click the Identify monitors button.
- Check the Use my settings for this device option.
-
Click the Add button.
-
In the "Associated Color Profile" page, click the Browse button.
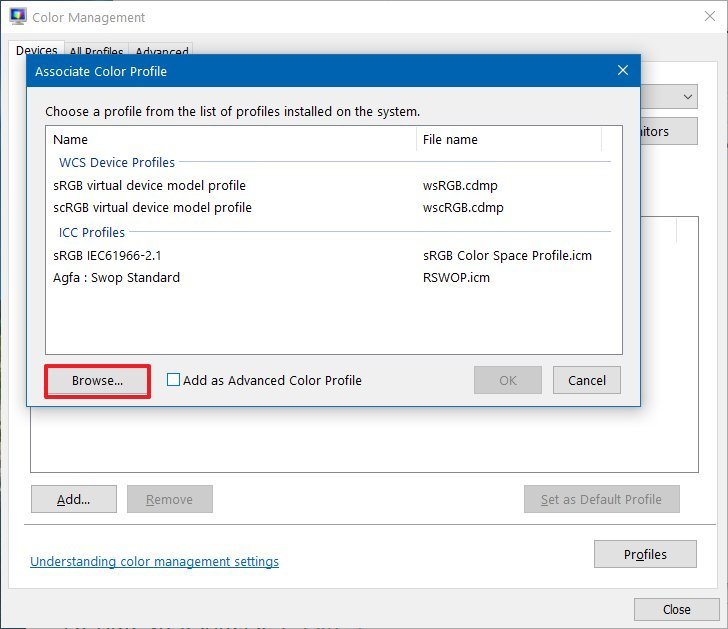
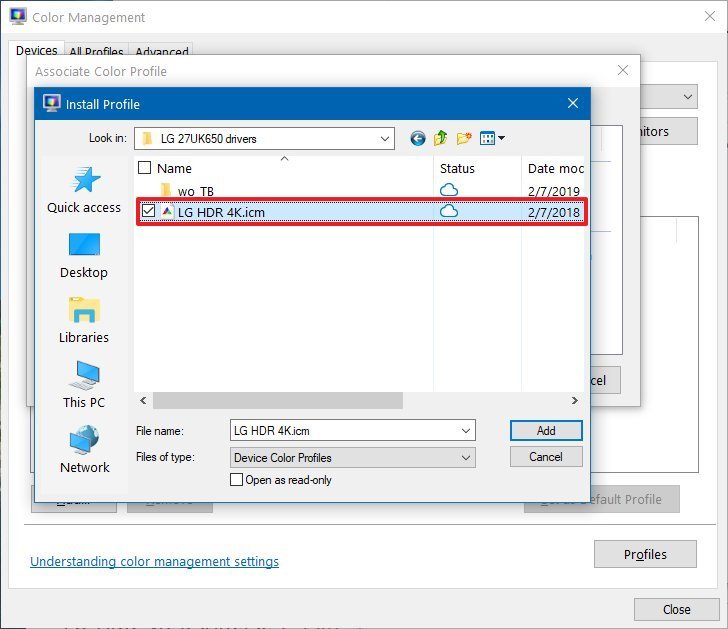
- Browse to the folder that has the color profile that you extracted earlier.
-
Double-click the .icm file to install the new profile.
-
Click the Close button.


After completing the steps, you may notice a small color change on your display. This is one expected behavior because you just told the system to use a different profile to display colors.
How to reset color profile settings on Windows 10
If something goes wrong, or you want to revert the changes, you can use these steps to reset your monitor settings to the default color profile:
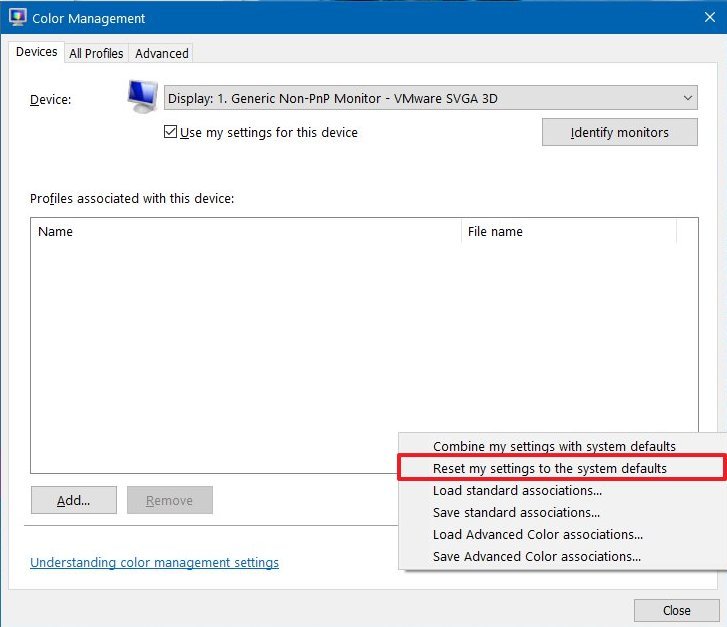
- Open Start.
- Search for Color Management and click the top result to open the experience.
- Click the Devices tab.
- Click the Profile button.
- Use the "Device" drop-down menu and select the monitor that you want to reset.
-
Select the Reset my settings to the system defaults option.

Once you complete the steps, the monitor you selected will revert to its default color profile settings.
Wrapping things up
Although the Color Management tool allows you to set up custom color profiles manually, remember that monitors as well as other devices, usually, install the recommended color profile during the setup process automatically, which means that most of the time, you don't have to mess with these settings.
Update February 7, 2019: This guide has been revised to make sure it's current with the latest version of Windows 10.
More Windows 10 resources
For more helpful articles, coverage, and answers to common questions about Windows 10, visit the following resources:
- Windows 10 on Windows Central – All you need to know
- Windows 10 help, tips, and tricks
- Windows 10 forums on Windows Central
We may earn a commission for purchases using our links. Learn more.

See more
These are the best 27-inch monitors money can buy
A 27-inch monitor is just about the perfect size without having to sit too far away or whip your head back and forth to follow things across the screen. If you're in the market for a new monitor, check out our top picks.
How to Set Color Profile in Windows 10
Source: https://www.windowscentral.com/how-configure-correct-color-profile-your-monitor-windows-10